On the servers provided by us an IPv6 address is already preconfigured. However on some servers the IPv6 connectivity still has to be activated. If your server can not establish a IPv6 connection, please perform the following steps:
Linux
- Connect to your server via SSH
- Execute the following command with root rights:
enable_ipv6 - Reboot your server
Windows
- Connect to your server via RDP with the administrator account
- Open the command prompt by pressing the Windows+R keys and typing "cmd"
- Execute the following command:
reg add "HKEY_LOCAL_MACHINE\SYSTEM\CurrentControlSet\Services\Tcpip6\Parameters" /v DisabledComponents /t REG_DWORD /d 0x00 /f - Reboot your server
If your operating system was not installed by us, e.g. because it is a colocation device or it was installed manually by you, the necessary information needs to be added to your system manually. The following guide should give you enough information to get IPv6 up and running on your server.
Obtaining the necessary information
We have already assigned an IPv6 address to every one of your services where applicable. You can find this address in your customer control panel, which should look like this:

Do not use the address space shown in the image, "2a02:c200:0:10:3:0:7:1". Use your own IPv6 address space from your customer control panel instead.
At this time, the following additional information is valid for every IPv6 enabled server:
Netmask / Prefix length: 64
Gateway: fe80::1
For servers with a /64 network starting with "2a02:c205", please use the following IP addresses as resolving name servers:
Resolver/DNS server 1: 2a02:c205::1:53
Resolver/DNS server 2: 2a02:c205::2:53
For servers with a /64 network starting with "2a02:c207", please use the following IP addresses as resolving name servers:
Resolver/DNS server 1: 2a02:c207::1:53
Resolver/DNS server 2: 2a02:c207::2:53
Initial configuration (Linux-based operating systems)
Before adding this IPv6 address to your configuration files and thus making the changes persist after a server reboot, you might want to configure it manually. I will use the IPv6 address 2001:db8::1 in this example. Please replace it with the appropriate address assigned to the server in question. If your network card is not eth0, you will have to replace "eth0" with the appropriate value, too.
Add the address to the server's network interface in the format /:
ip addr add 2001:db8::1/64 dev eth0
You can validate that the address has been enabled by running
ip -6 addr show
which should show, among others, the following lines:
2: eth0: <BROADCAST,MULTICAST,UP,LOWER_UP> mtu 1500 qlen 1000
inet6 2001:db8::1/64 scope global valid_lft forever preferred_lft forever
In order to reach everyone else in the ever growing IPv6 world, add a default route to the server's configuration:
ip route add default via fe80::1 dev eth0
Again, you can verify the setting by running
ip -6 route show
which should show the following output:
default via fe80::1 dev eth0 metric 1024 mtu 1500 advmss 1440 hoplimit 4294967295
You can now check your IPv6 connectivity by using the ping6 command:
ping6 2a02:c205:0:5001::1
Making things persist (Linux-based operating systems)
Different operating systems have different ways of setting up the network configuration. If in doubt, please search the documentation for your operating system. Sample configurations for Debian/Ubuntu and CentOS/Fedora/RedHat will be provided here. Please be very careful when applying these changes. Errors may result in your server no longer responding to any network traffic at all!
Debian / Ubuntu till 17.04
Edit the file /etc/network/interfaces and add the following lines:
iface eth0 inet6 static
address 2001:db8::1
netmask 64
gateway fe80::1
accept_ra 0
autoconf 0
privext 0
Ubuntu 17.10 and above
Ubuntu is using Netplan since version 17.10. To configure IPv6, please add the required address as shown in the example bellow into your /etc/netplan/01-netcfg.yaml. Please also add the entry for "gateway6". The usage of correct indentations is important. Please leave the other entries, for example "macaddress", the way they are.
network:
version: 2
renderer: networkd
ethernets:
eth0:
match:
macaddress: 00:50:56:3d:c3:aa
addresses:
- 207.180.193.3/32
- 2001:0db8::1/64
gateway6: fe80::1
routes:
- to: 0.0.0.0/0
via: 192.51.100.1
on-link: true
nameservers:
search: [ invalid ]
addresses:
- 79.143.183.251
- 79.143.183.252
- 2a02:c205::1:53
- 2a02:c205::2:53
CentOS / Fedora / RedHat
Make sure IPv6 networking is enabled at all by editing /etc/sysconfig/network. Add the following line to this file:
NETWORKING_IPV6=yes
Then add the IP configuration to the file /etc/sysconfig/network-scripts/ifcfg-eth0
IPV6INIT = "yes"
IPV6ADDR = "2001:db8::1/64"
IPV6_DEFAULTGW = "fe80::1"
IPV6_DEFAULTDEV = "eth0"
This should make sure the IPv6 address gets enabled again after your server reboots.
Configuration steps for Windows Server operating systems
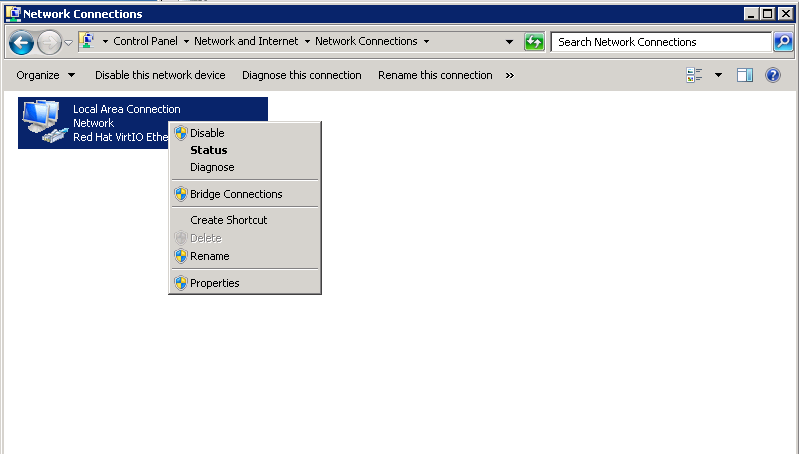
After you have connected to your server using RDP, click on "Start" > "Control Panel" > "Network and Internet" > "Network and Sharing Center". Click on "Change Adapter Settings" on the left side of the window. Right-click the icon for the network connection, select "Properties" from the menu:

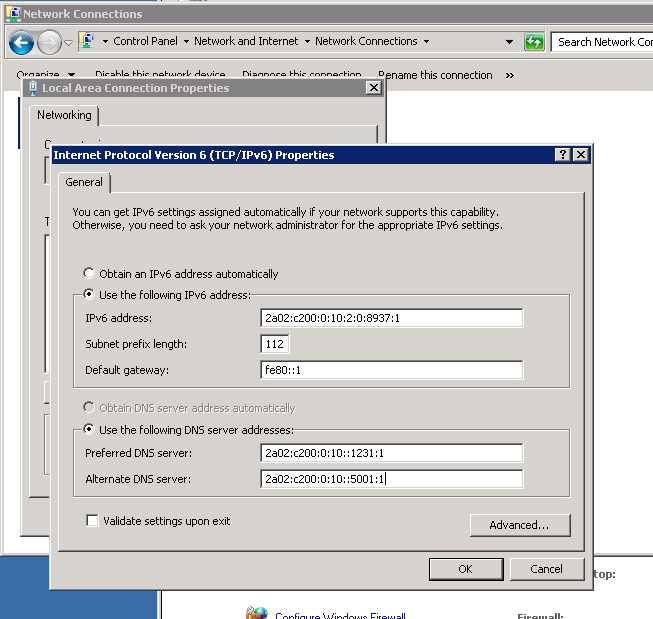
Highlight the entry "Internet Protocol Version 6 (TCP/IP)" on the list, make sure that the checkbox is ticked and click on "Properties" again. Enter the information you gathered from step one as shown below:

Click on "OK", to close the dialogues and save the changes.
Still cannot reach your server via IPv6?
If you have made the changes as described above and if the ping6 command did return a response but you nevertheless cannot reach your server via IPv6 from your local computer, chances are that IPv6 might not yet be enabled in your local network. Your local ISP can help in this case.

